Balloon Mosaic Letters and Numbers DIY
Ingredients
- 5 20"x30" foam boards per letter
- Ruler
- Packaging tape
- Scotch tape
- Rotary cutter (optional)
- Exacto knife
- Hot glue gun
- Pencil
- Balloons in various colors and sizes
- A large printout of your letter 40” tall
Instructions
Make The Foam Letter
-
Cut 5” long strips out of 2 of the foam boards making 8 strips. You may need a little more depending on the letter.
-
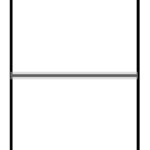
With the packaging tape, tape 2 of the boards together on the long side, making a large 40”x30” board.
-
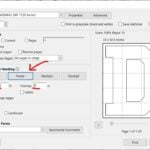
Print the desired large letter. The letter can be printed on several pieces of paper using the “Poster” option when opened in the FREE Adobe Acrobat Reader and setting the overlap to “0”.
-
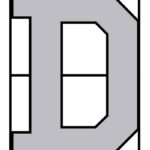
Arrange the printout of the letter over the large 40“x30” foam board. Tape the printouts together forming the letter. The top and bottom edges of the print should be on the edges of the foam board. The letters in this file are 40“ tall when printed at 100%.
Since you set the overlap to 0, the edges of the printed letters will butt to each other. So all you have to do is overlap the margins of the paper.
-
With the letter pattern on top, trim the foam board on the lines with a ruler and rotary cutter or exacto knife. All the letters and numbers in this set have straight edges.
-
Remove the paper.
-
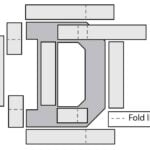
Mark and cut all the 5” strips to go around the inside and outside of the letter. Whenever possible, score the strip to fold it around the pattern instead of cutting it
-
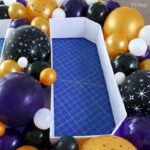
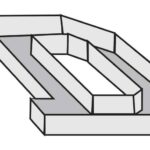
Glue the strips to the letter body with a hot glue gun by placing the glue on the edges of the 5” strips and gluing to the sides of the letter.
-
Glue the corner edges of the strips with hot glue and reinforce them with some scotch tape. Try to keep the tape on the balloon side of the channel.
-
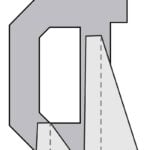
With an extra foam board or remnants, make a couple of triangle braces to glue on the back of the letter for stability.
Fill Your Letter with Balloons
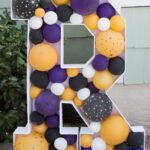
-
Fill your letter with balloons. Inflate your balloons only as wide as the channel, but no more. They should still feel soft to the touch. Otherwise, you risk deforming your channel. A hot glue gun set on low temperature or glue dots work perfect. Then place smaller balloons in all kinds of sizes to fill in the holes as well as you can. I made large and medium size balloons with 12" balloons and smaller balloons with 5" balloons. It’s OK for the balloons to go above the walls of the channel.